A visual way to plan and manage agile projects
In the dynamic world of Agile development, visualizing the product journey is paramount. Enter story mapping: a robust technique pioneered by Jeff Patton in 2005 that offers a panoramic view of product features from the user’s perspective. By organizing features based on user stories, this two-dimensional map can serve as a cornerstone for Agile teams to plan more effectively and deliver enhanced value.
With tools like ProductGo integrating story mapping into Jira, Agile teams now have even more sophisticated means to keep track of and manage their projects. This article delves deep into the intricacies of story mapping, offering insights into its components, benefits, and how to integrate it into Agile projects effectively.
Understanding Story Mapping
Definition of Story Mapping
Story mapping is a technique for visualizing and organizing the features of a product or service from the perspective of the end user. It was introduced by Jeff Patton in 2005 and has since become a popular tool for agile teams to plan and deliver value to their customers.
Story mapping involves creating a two-dimensional map of user stories, where the horizontal axis represents the user journey or the main activities that the user performs, and the vertical axis represents the level of detail or priority of each story. The map helps to identify the core functionality, the dependencies, the gaps, and the opportunities for improvement.
Components of Story Mapping
It consists of four main components: goal, epic, user story, and swimlane.
- Goal: This is the overall objective of your product or feature. It describes what problem you are trying to solve and why it matters to your users and stakeholders.
Example: Improve user engagement and retention - Epic: This is a large chunk of work that contributes to the goal. It usually spans multiple sprints or releases and can be broken down into smaller user stories.
Example: Add gamification elements - User story: This is a specific requirement or functionality that delivers value to the user. It follows the format of “As a [user role], I want to [action], so that [benefit].”
Example: As a user, I want to earn badges for completing tasks, so that I feel motivated and rewarded. - Swimlane: This is a horizontal line that divides the story map into different sections based on the sprint or release. It helps you prioritize and schedule the user stories according to your roadmap.
Example: Sprint 1 | Sprint 2
Benefits of Story Mapping
The benefits of user story mapping are many and can have a significant impact on the development process.
- Improved collaboration and communication. One of the key benefits of user story mapping is that it provides a shared understanding of the product and its features among all stakeholders.
- Increased clarity and understanding. Teams can use user story mapping to understand the big picture and to see how individual product backlog items fit into the overall development effort.
- Better alignment with stakeholder goals. It allows teams to prioritize product backlog items based on their alignment with the goals and priorities of the stakeholders.
- Faster decision-making. Decision-making becomes quicker and more efficient with a shared understanding of the product structure and priority.
- Improved prioritization. User story mapping helps teams prioritize their product backlog items, making it easier to focus on the most critical work and avoid scope creep.
Read more about the Benefits of Story Mapping here!
The Process of Creating a Story Map
Creating a story map is not a one-time activity but an ongoing process that evolves as you learn more about your users and your product. However, there are some general steps that you can follow to get started.
Initial Planning
The first step is to identify who your end-users are and what their goals are. You can use personas, interviews, surveys, or other techniques to gather this information.
Then, you can write user stories that describe what the users want to do or achieve with your product. A user story is a simple sentence that follows the format: “As a [user], I want to [do something], so that [benefit]”.
Next, you can categorize your user stories based on criteria such as functionality, user role, or theme. This will help you to group similar stories and avoid duplication.
Organizing User Stories
Grouping stories into activities and arranging them based on user journey stages.
The second step is to organize your user stories into a map. You can create your map using sticky notes, index cards, or a digital tool like ProductGo. The idea is to group your stories into activities or epics, which are high-level tasks the users perform with your product.
For example, “Enroll in courses”, “View grades”, or “Manage profile”. Then, you can arrange your activities horizontally based on the user journey stages, which are the phases that the users go through when using your product. For example, “Explore”, “Register”, “Learn”, or “Review”.
Prioritizing and Estimating
The third step is to prioritize and estimate your user stories. Prioritization helps you to decide which stories are more important or urgent than others. You can use various techniques to prioritize your stories, such as value vs effort matrix, MoSCoW method, or Kano model. The goal is to deliver the most value to the users with the least effort.
Estimation helps you to determine how much time and resources are needed to implement each story. You can use various techniques to estimate your stories, such as planning poker, t-shirt sizes, or Fibonacci numbers. The goal is to have a realistic and consistent estimation across the team.
Slicing the Map for Releases
The fourth step is to slice your map for releases. A release is a set of features you deliver to the users at a particular time. You can use your map to plan your releases based on different criteria, such as business goals, user feedback, or technical dependencies.
One of the most essential concepts in agile development is the Minimal Viable Product (MVP), the most miniature version of your product. It provides enough user value and allows you to validate and learn from your assumptions. You can use your map to identify your MVP by selecting the most essential stories from each activity and stage.
After defining your MVP, you can plan iterative releases by adding more stories from your map until you reach your desired product vision. You can also adjust your releases based on new insights or changes in the market.
Incorporating Story Mapping in Agile Frameworks
What is Agile Frameworks
Agile frameworks are principles and practices that aim to deliver software products or services in an iterative, incremental, and adaptive way.
Agile frameworks embrace change, collaboration, feedback, and customer satisfaction as the main drivers of value creation. Scrum, Kanban, XP, and SAFe are the most popular agile frameworks.
Jira Story Mapping
Jira is a project management tool that can be used to support any agile methodology. In contrast, agile frameworks are a set of principles and practices that help teams deliver value to customers quickly and iteratively.
Jira can be used to visualize and track work, manage sprints, and collaborate with team members, while agile frameworks provide a structure for planning, executing, and reflecting on work.
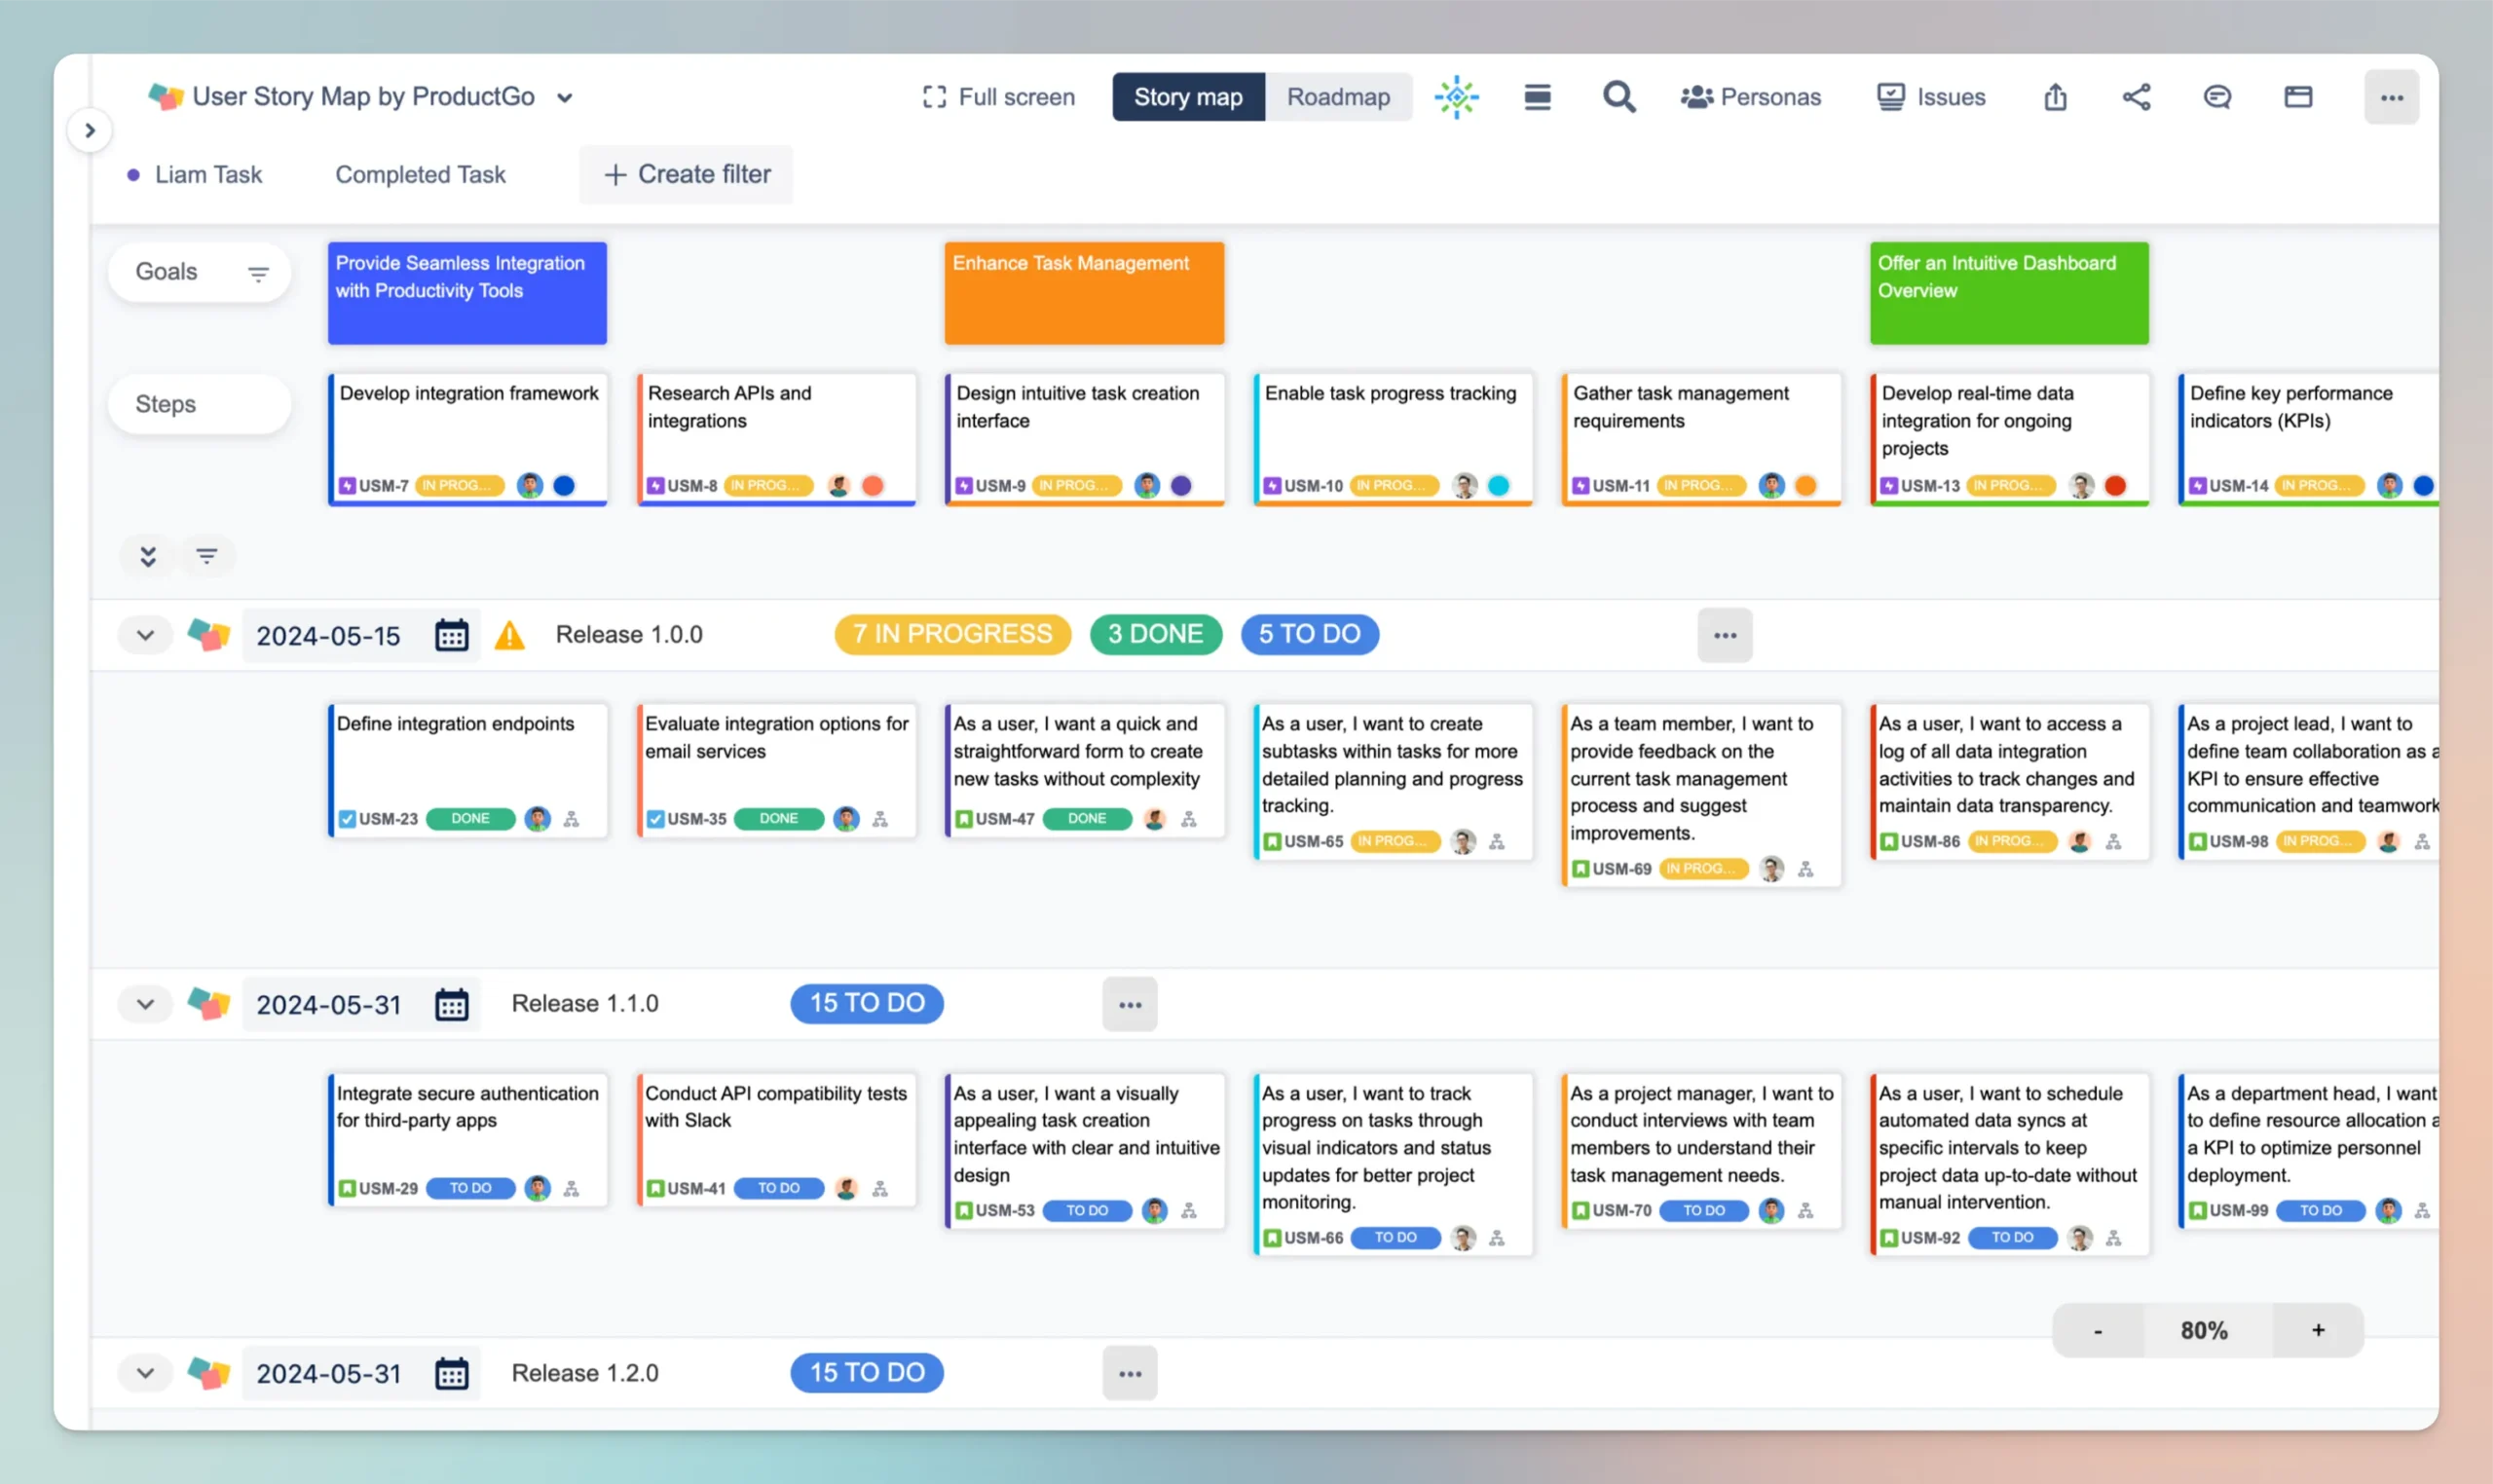
Steps to create a user story map in Jira
Following these quick steps will help you create a user story map in Jira:
1. Access to the User Story Map by ProductGo in your Jira projects
- Go to the Apps menu and select ProductGo.
- Select the Jira project where you want to create the user story map.
2. Identify the Goals – Epics – Stories
- Goals: Identify the high-level goals that users want to achieve with your product.
- Epics: Break down the goals into smaller, more manageable pieces of work.
- Stories: Write a user story for each epic. A user story is a brief description of what a user wants to do and why. Follow this format:
As a [user role], I want to [do something] so that [I can achieve a goal].
3. Put User Stories into Swimlanes
- Swimlanes are used to group user stories by release or sprint.
- Drag and drop the user stories into the appropriate swimlanes.
4. Start a Sprint/Release
- Once you have organized the user stories into swimlanes, you can start a sprint or release to begin implementing them.
For more details, read this article: ProductGo Basics #3: How to use User Story Map by ProductGo
Practical Tips for Effective Story Mapping
Engagement of Stakeholders
One of the key benefits of story mapping is that it fosters engagement and communication among all the relevant stakeholders in your project. Stakeholders can include product owners, developers, testers, designers, customers, users, and anyone else who has a stake in the outcome of your product.
By involving them in the story mapping process, you can ensure that everyone has a shared understanding of the user journey, the features, and the priorities. You can also elicit feedback and ideas from different perspectives and incorporate them into your story map.
Continuous Refinement
Another important tip for effective story mapping is to keep your story map updated and refined throughout the project lifecycle.
As you learn more about your users, product, and market, you may need to change or add user stories to your story map. You may also need to adjust the priorities or dependencies of your stories based on new information or feedback.
Visualization Tools
The last tip we will share is using visualization tools to help you create and manage your story maps more efficiently and effectively.
While you can create a story map using physical tools such as sticky notes and whiteboards, you may find it challenging to maintain and share them with remote or distributed teams. You may also face issues such as limited space, poor visibility, or loss of information.
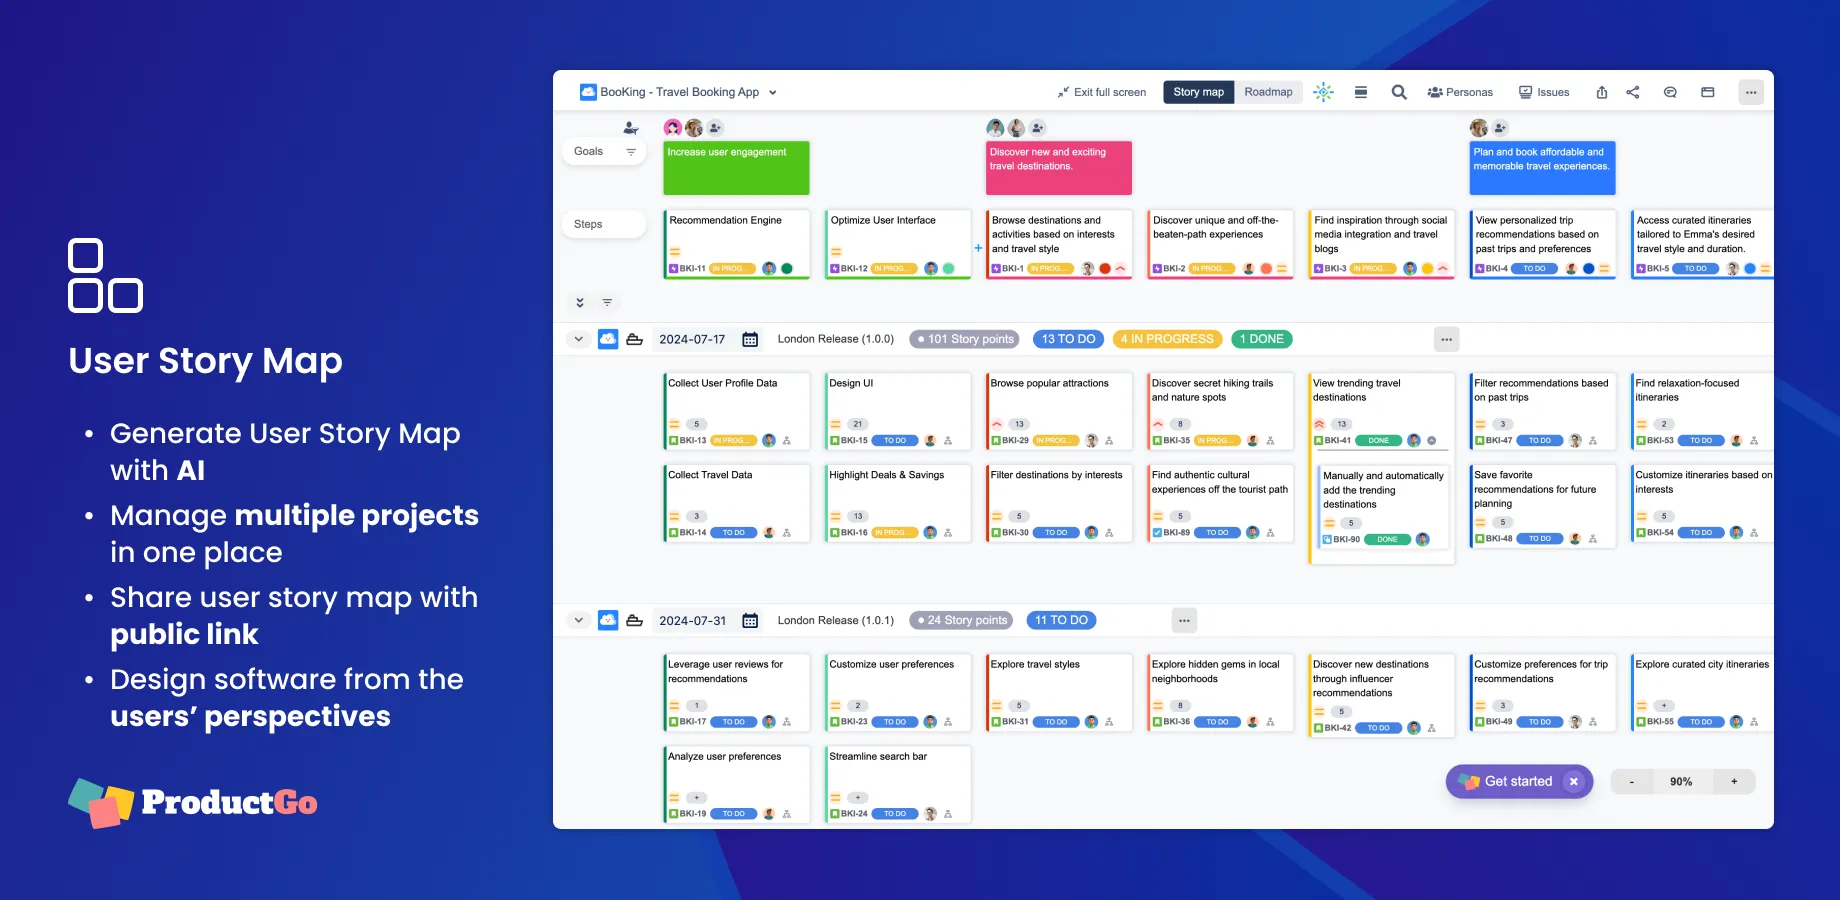
To overcome these challenges, you can use various tools and software that can help you create visual and interactive story maps online. Our recommendation is ProductGo – Agile User Story Maps, Roadmaps & Persona for Jira, one of the best story mapping tools for Jira.
With ProductGo, user analysis, managing product backlogs, and keeping track of your projects are simplified with its unique functionalities for Portfolios, Projects, and Agile Boards, along with visual models from the users’ perspective.
Sum Up
Story mapping has revolutionized the way Agile teams approach project planning. By creating a visual roadmap of the user’s journey, teams can prioritize tasks, communicate more efficiently, and align their goals better with stakeholder expectations. Leveraging tools such as ProductGo’s story mapping ensures that Agile teams remain cohesive and informed even in our increasingly digital and remote work environment.
As with any methodology, the key to successful story mapping lies in continuous engagement, regular refinement, and the right visualization tools. In doing so, Agile teams can transform their project delivery and bring their product visions to life more effectively.