Short answer: User story mapping is a way to lay out a product the way a user moves through it. The user’s big steps run left to right, the stories for each step stack underneath in priority order, and lines across the map show what ships in each release. It helps teams see the whole product, not just a long backlog.
If you’ve ever stared at a backlog of 200 items and wondered how it all fits together, this guide is for you. By the end, you’ll know how to run your first mapping session, read a map, and use it to cut a first release your team can actually ship.
What is user story mapping?
User story mapping is a visual way to plan a product around what users actually do. Instead of a single ranked list, you arrange user stories on a two-dimensional map. The horizontal axis follows the user’s journey. The vertical axis shows priority, with the most important stories at the top.
The idea was popularized by Jeff Patton, who described it in the book User Story Mapping with Peter Economy in 2014. The Nielsen Norman Group’s guide cites the book as the reference for the method, and Patton’s own articles on story mapping are still worth reading.
Why call it a map? Think about planning a road trip. A packing list tells you what to bring, but it doesn’t tell you where you’re going or in what order. An itinerary does. A backlog is the packing list. A story map is the itinerary: it shows the route first, then what you need at each stop.
That’s the shift. You stop asking “what’s next in the list?” and start asking “what does the user need to get from start to finish?”
The parts of a user story map
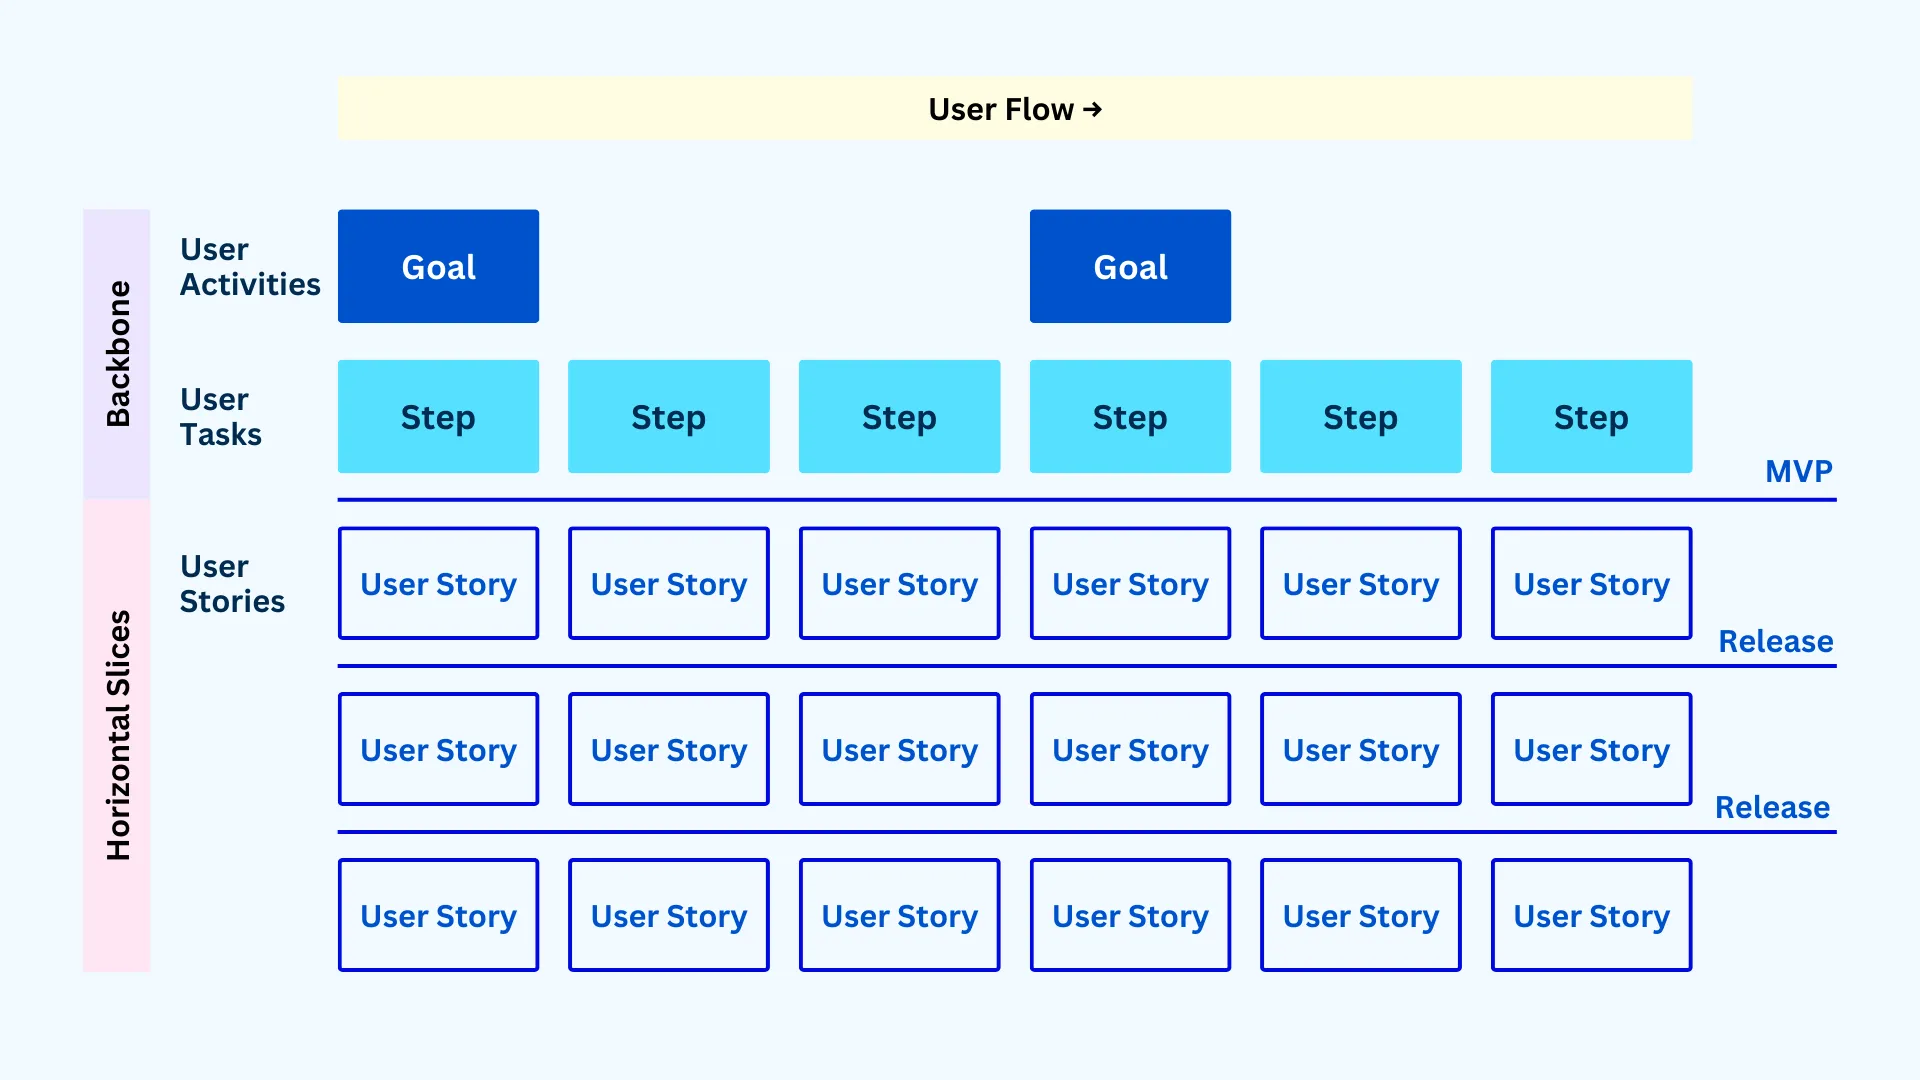
Every story map has the same basic layers. Once you can name them, you can read any map in a few seconds.
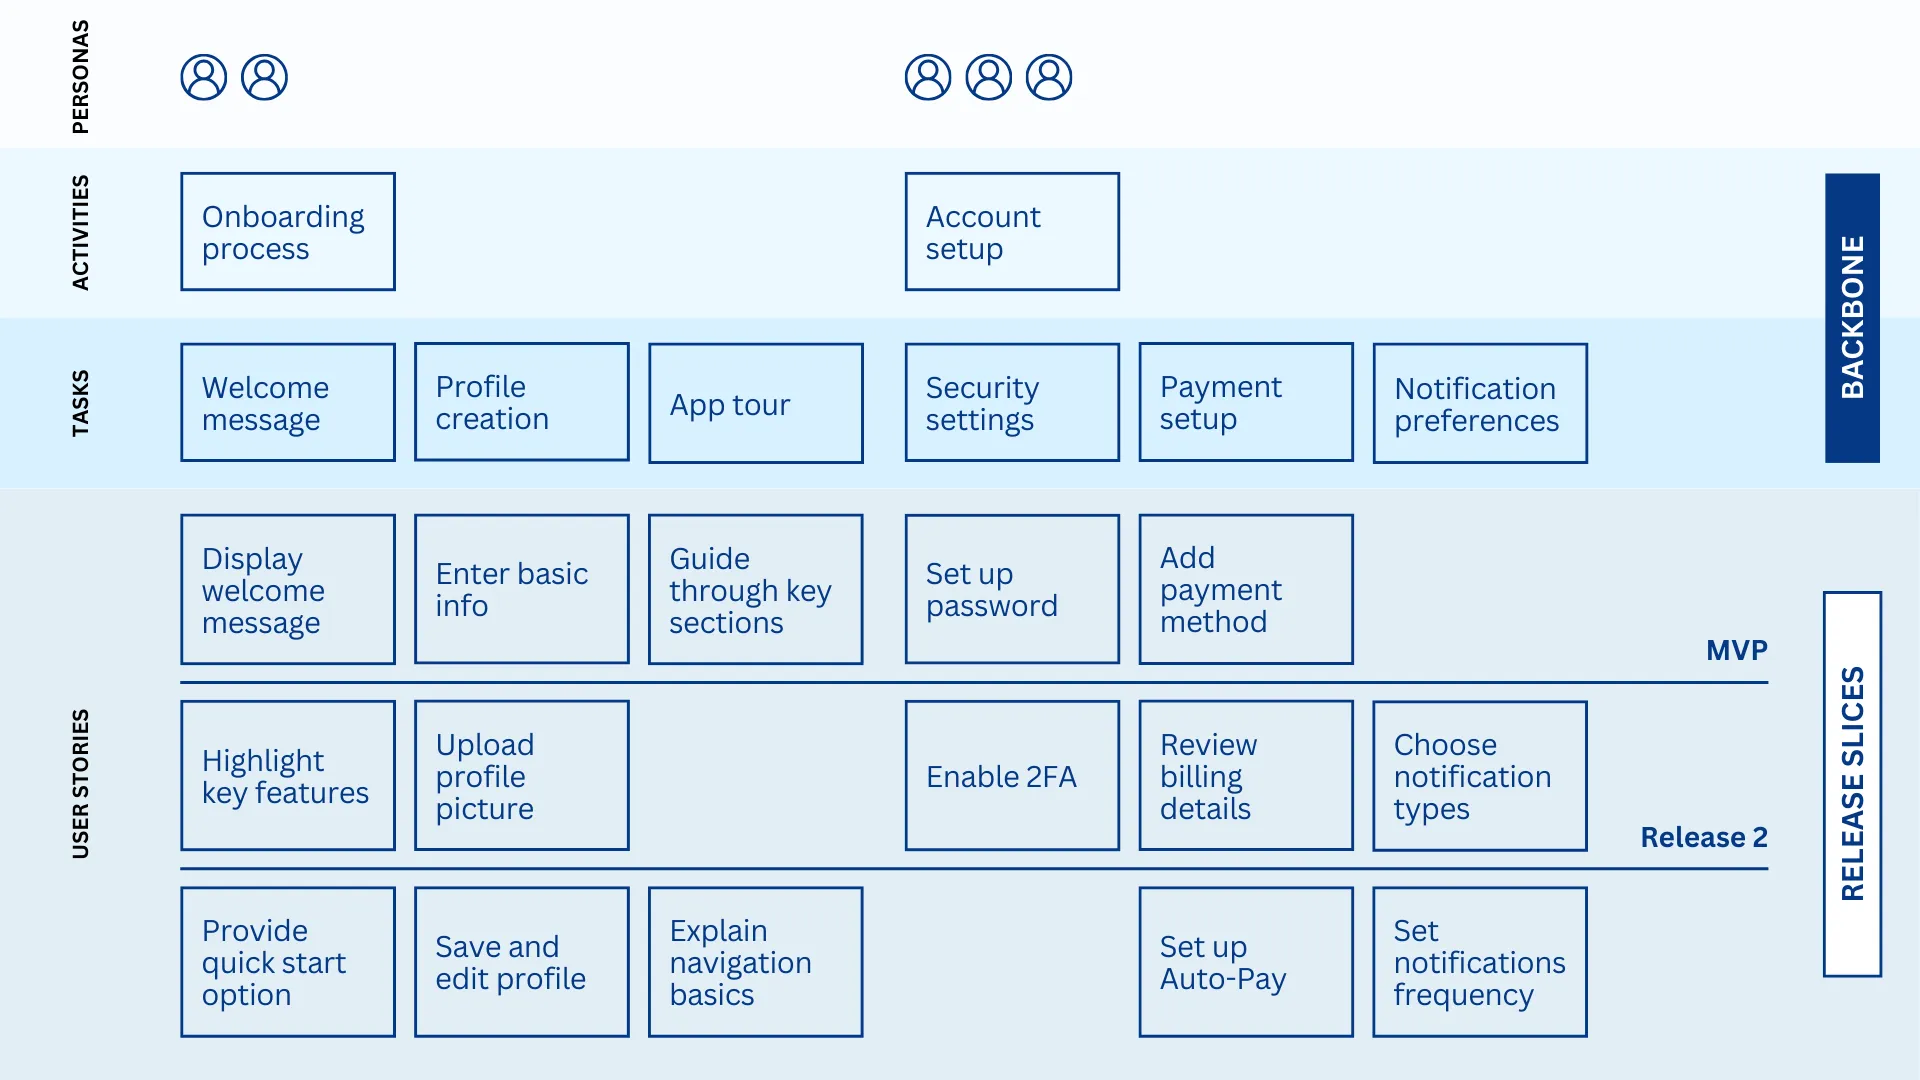
The backbone. Across the top sit the big things a user does, often called activities. For an online shop, that might be “Browse products”, “Buy” and “Track my order”. Read them left to right and you get the story of the product in one line.
Steps. Under each activity, the steps break it down in order. “Buy” becomes “Review cart”, “Enter delivery details”, “Pay” and “Get confirmation”.
User stories. Under each step, the stories stack from most to least important. The top story under “Pay” might be “Pay by card”. Further down you might find “Pay with a saved card” or “Split payment”.
Release lines. Horizontal lines across the whole map split the stories into releases. Everything above the first line is your first release.
At userstorymap.io we also like adding one more layer above the backbone: the user’s goals. They keep the map tied to outcomes rather than features. We explain why in why your user story map needs a goal level, and the structure of the user story map goes deeper into each layer.
Why teams use story mapping
Picture two teams with the same 200 stories. The first team has them in a ranked backlog. The second has them on a map.
Ask both teams “what’s in the first release?” The first team scrolls, debates, and probably misses something. The second team points at everything above the first line.
That’s the main benefit, but not the only one.
- Everyone sees the same picture. Developers, designers, testers and stakeholders look at one view of the product instead of reading a requirements doc each in their own way.
- Gaps show up early. An empty column under a step means nobody has thought about that part of the journey yet.
- Cutting an MVP gets easier. You slice across the whole journey, so the first release works from start to finish instead of being half a product. Our guide to building an MVP with user story mapping walks through this.
- Stakeholder conversations get shorter. It’s easier to agree on scope when people can see what moves to the next release and why.
Your team probably needs a map if nobody can explain what’s in the next release, if the backlog only grows and never makes sense, or if new teammates take weeks to understand the product.
When to use it, and when not to
Story mapping works best at the start of something: a new product, a big new feature, a redesign, or a release that touches many parts of the product. It’s also handy during discovery, when you’re still working out what users need.
It’s not worth it for everything. Bug fixes, small tweaks and one-off tasks don’t need a map. If a piece of work fits on a single sticky note, a backlog item is fine.
How to create a user story map in 6 steps
You can do this with sticky notes on a wall, on an online whiteboard, or in a tool inside Jira. The steps are the same either way.
Before you start, get the right people in the room. You’ll want someone from product, design, development and testing. Four to six people is plenty, and a larger group tends to slow things down. That’s our experience rather than a hard rule. If you’re remote, a video call and a shared board work fine.
1. Set the goal and scope
Agree on what you’re mapping and why. “The whole product” is usually too big. “The first version of online booking” is about right.
Check: can everyone say the goal in one sentence?
2. Name your users
Write down who you’re building for and what they’re trying to get done. If you already use personas, bring them in. Our post on how personas work with a user story map shows how.
Check: could you describe a real person who fits each user type?
3. Build the backbone
List the big activities your user goes through, from first contact to done, and put them in order left to right. Then add the steps under each one.
Check: read the backbone out loud. Does it sound like a story a user would tell?
4. Add stories under each step
Brainstorm what the product needs to do for each step, written from the user’s side. Don’t judge ideas yet. Get them all on the board.
Check: does every step have at least one story? Empty columns are gaps.
5. Rank from top to bottom
Under each step, move the most important stories to the top. Ask, “Could a user finish the journey without this?” If yes, it moves down.
Check: the top row alone should describe a simple but complete product.
6. Slice releases, and keep the map alive
Draw a line under the stories that make up your first release. Then draw the next line for release two. Our guide to release planning with a user story map covers this step in detail.
The map isn’t done after the workshop. Update it as you learn, move stories between releases, and use it in sprint planning. A map nobody updates turns into wallpaper.
Check: can a user reach at least one goal using only the first release?
Want a longer guide to running the workshop itself? See our guide to running user story mapping sessions.
A user story map example
Here’s a small example we wrote for an online shop’s checkout. It’s simplified on purpose, so you can see the shape. The activity is “Buy”, the columns are its steps, and each row is a release.
| Review cart | Enter delivery details | Pay | Get confirmation | |
|---|---|---|---|---|
| Release 1 | See items and total | Enter an address | Pay by card | See an order number on screen |
| Release 2 | Change quantities | Save addresses for next time | Pay with a saved card | Get a confirmation email |
| Later | Apply a discount code | Pick a delivery slot | Pay in instalments | Track the order in real time |
Read the first row on its own. It’s basic, but a customer can buy something from start to finish. That’s what makes it a good first release.
Now imagine the same 12 stories in a backlog, ranked one after another. You’d lose the shape of the journey, and “Pay by card” could easily end up below “Apply a discount code”.
Want more? We’ve put together user story map examples for other kinds of products.
Common mistakes to avoid
Most story maps that fail don’t fail in the workshop. They fail a few weeks later. Here are the mistakes we see most often.
- Mapping the whole product at once. A map of everything turns into a wall nobody can read. Map one goal, feature or release at a time.
- Writing system tasks instead of user actions. “Set up database” isn’t something a user does. Keep the backbone in the user’s words, and put technical work under the stories it supports.
- Letting one person do all the talking. If only the product owner speaks, you get their view of the product, not the team’s. Ask quieter people to place the first stickies.
- Skipping the release lines. Without them, you have a nice picture and no plan. The lines are where decisions get made.
- Never updating the map. A map that doesn’t match the backlog stops being trusted. Revisit it at least once per release.
We cover more of these, with fixes, in common pitfalls when setting up a user story map in Jira.
User story map vs backlog vs journey map vs roadmap
These four get mixed up a lot. They work best together, each answering a different question.
| What it shows | Use it when you want to know | |
|---|---|---|
| User story map | The user’s journey, with the stories for each step and release lines | What to build, and in which release |
| Product backlog | One ranked list of work items | What the team works on next |
| Customer journey map | How users feel and act across every touchpoint, often outside the product too | Where the experience hurts |
| Roadmap | Goals or themes on a timeline | When things are planned to happen |
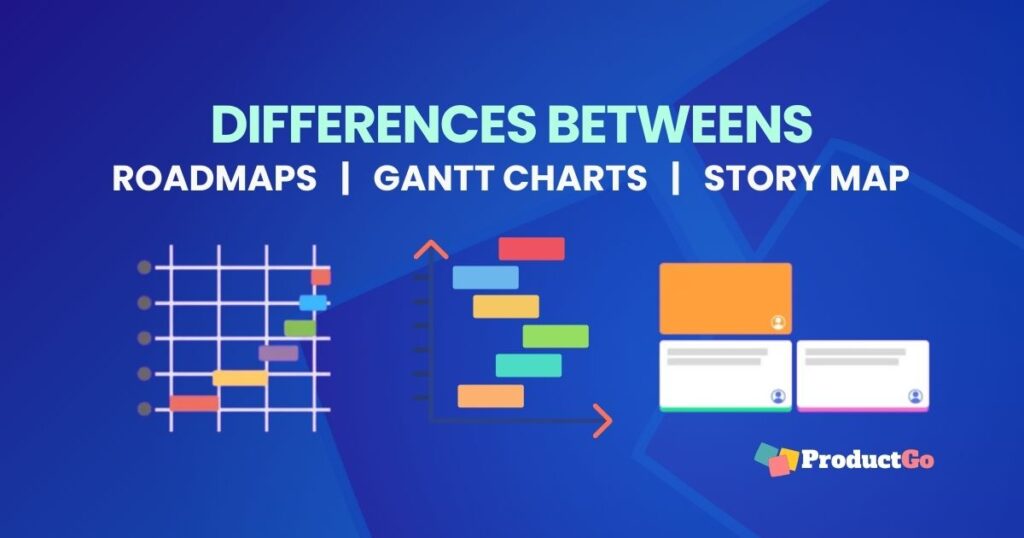
In short, the journey map finds the problems, the story map turns them into a plan, the backlog runs the day-to-day work, and the roadmap shares the timing. For more detail, see can a story map replace the product backlog? and roadmaps, Gantt charts and story maps.
Tools for user story mapping
You don’t need special software to start. Sticky notes and a wall are still a great way to run your first session.
Online whiteboards such as Miro or Confluence whiteboards work well for remote workshops. Atlassian’s story mapping guide suggests Confluence whiteboards for exactly that. The catch is that the board and your backlog are separate, so someone has to keep them in step.
If your team works in Jira, a story map app builds the map from your real Jira issues, so the two never drift apart. Options include our own ProductGo.
With ProductGo, you drag stories between releases and Jira updates as you go. An AI generator can suggest goals, steps and stories, so you start from a draft instead of a blank board. If you’re weighing your options, see does Jira have user story mapping? and how to create a user story map with AI in Jira.
Final thoughts
User story mapping isn’t complicated. It’s a simple change in how you look at work: journey first, then priority, then releases.
If you take one thing from this guide, make it this. Pick one small goal, gather four or five people, and build a map in a single session. Then draw your first release line and see whether the team agrees on it. That conversation alone is usually worth the time.
FAQ
What is the difference between a user story and a user story map?
A user story is one small piece of value, written from the user’s side, such as “As a shopper, I want to pay by card.” A user story map arranges many stories along the user’s journey and by priority, so you can see how they fit together.
Who should be involved in a user story mapping session?
Someone from product, design, development and testing, ideally four to six people. Bring in a stakeholder or customer-facing colleague if the scope is new to the team.
How long does a user story mapping session take?
It depends on the scope. In our experience, a first session for one feature or release often takes two to four hours, but treat that as a rough guide rather than a rule. Bigger scopes are best split across several sessions.
What is the backbone of a user story map?
The backbone is the row of big user activities across the top of the map, in the order a user goes through them. Everything else hangs underneath it.
Is user story mapping only for software teams?
No. Any team that delivers something to people in steps can use it, from marketing launches to onboarding new employees. We cover a few examples in agile story mapping for non-software projects.
Can you do user story mapping in Jira?
Not out of the box. Jira doesn’t include a story map view, but you can add one with a Marketplace app. See does Jira have user story mapping?
Is there a free user story mapping tool?
Yes. Sticky notes are free, and so is ProductGo for teams of up to 10 users on Jira Cloud, AI generator included.